Content
- Mechanical control system
- Governing system
- Control air system arrangement - Internal
- Control air system on engine
- Control air piping at driving end
- Control valves for starting and slow turning
- Control valves for pneumatic stop cylinders on injection pumps
- Control air to stop cylinders
- Control air conditioning
- Control air to booster
- Blocking valve for turning gear
- Control air pipes for gas venting system
- Control air pipes for waste gate and by-pass system
- Oil mist detection system
Mechanical control system
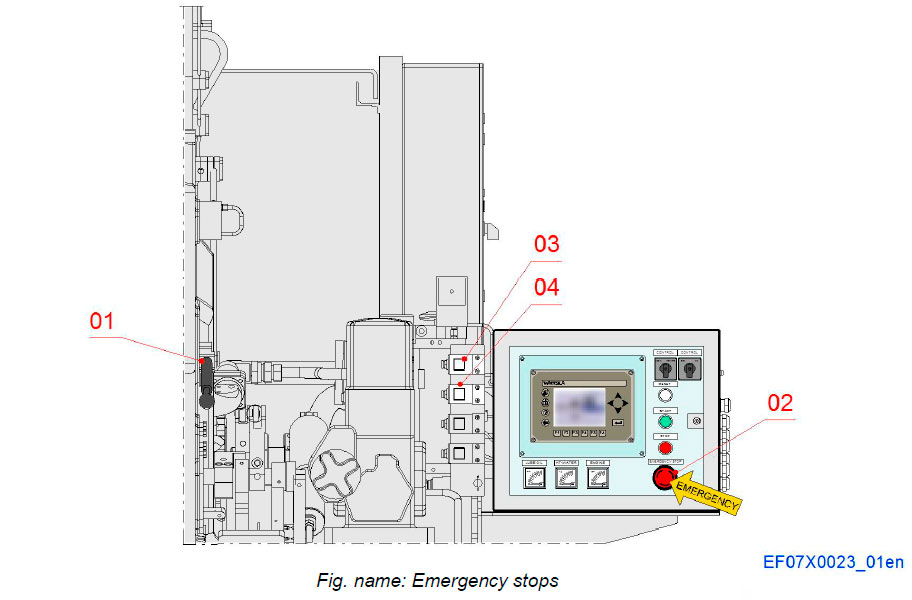
SHUT-DOWN MECHANISM
Shut-down mechanism includes emergency stop devices: Emergency stop button (02), the stop lever (01), on the exterior side of the end cover. The emergency stop button (03) and stop button behind the cabinet. Control devices directly act on the 3/2 solenoid valve of the control air system. Thus the fuel injection is cut.
System components
- 01 Stop lever
- 02 Emergency stop button
- 03 Emergency stop-shut down valve
- 04 Stop/shut down valve
CONTROL SHAFT ASSEMBLY, A-BANK
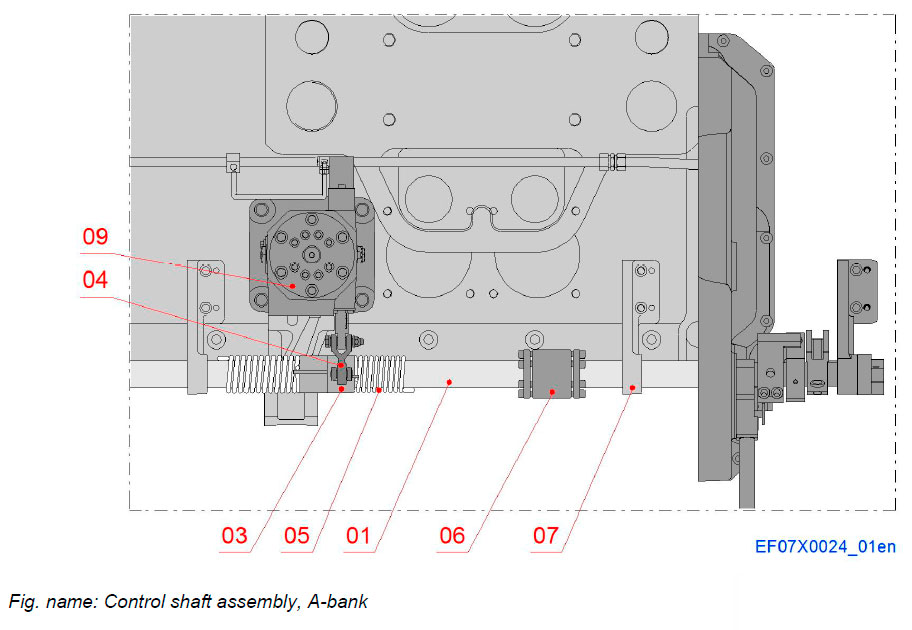
The control shafts mechanically connect the injection pump control racks to the actuator of governing system.
The movement from the control shaft, to the injection pump fuel racks, is transferred trough the control shaft lever (03) and then to the fuel rack lever (04). The torsion spring (05) enables the control shaft and, consequently, the other fuel rack to be moved to a stop position. In the same way the other torsion spring enables the control shaft to be moved towards fuel-on position.
System components
- 01 Quantity control shaft
- 03 Lever
- 04 Lever
- 05 Cylindrical torsion spring
- 06 Connection piece
- 07 Bearing bracket
- 09 Injection pump
CONTROL SHAFT AT DRIVING END, A-BANK
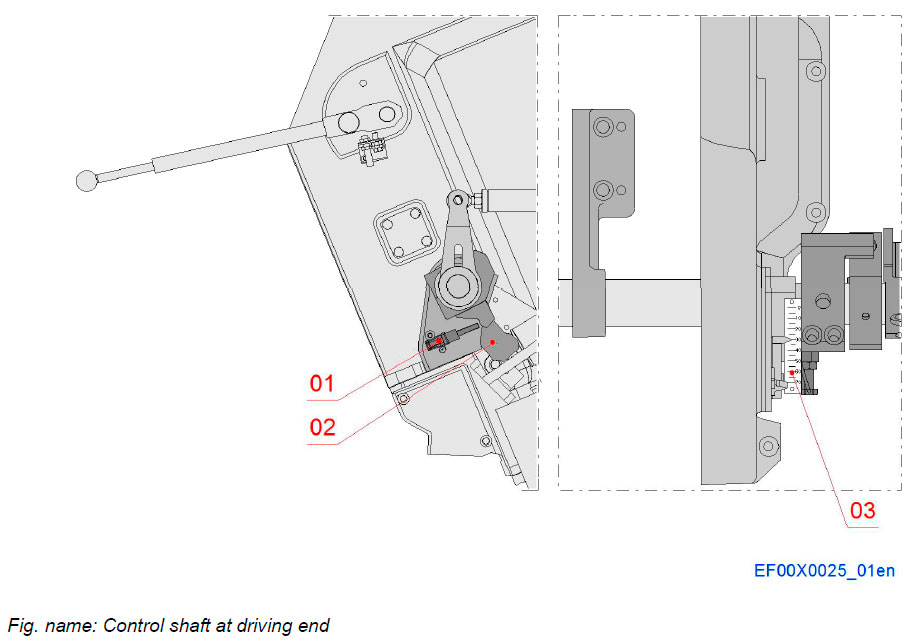
There is also a fixed mechanical limiter (01), affecting the regulating shaft directly by means of the lever. The limiter is adjusted and locked by the engine manufacturer so that the engine can not be overloaded and to give the best result for the operating characteristics of the engine.
System components
- 01 Mechanical limiter
- 02 Shaft lever
- 03 Load indicator
CONTROL SHAFT ASSEMBLY, B-BANK
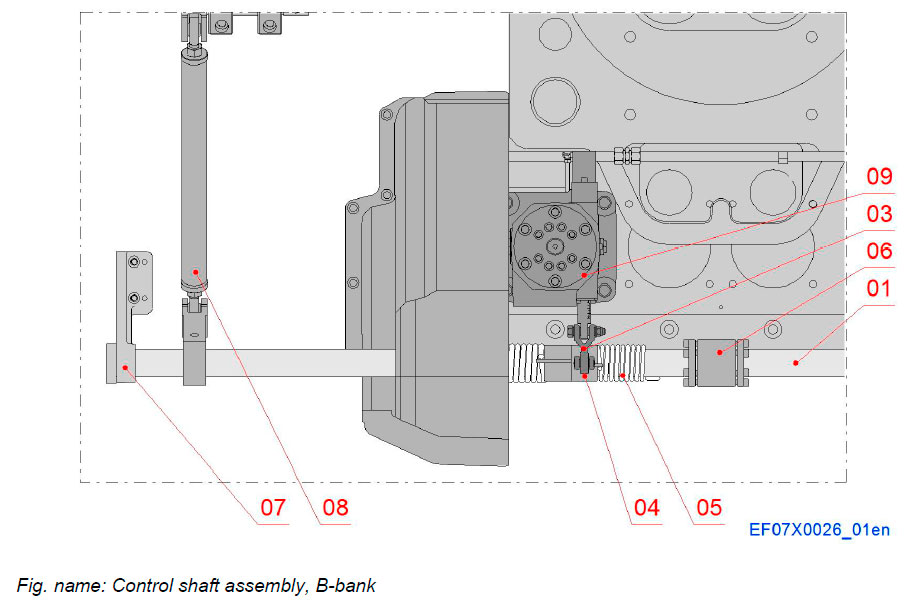
The control shafts mechanically connect the injection pump control racks to the actuator of governing system.
System components
- 01 Quantity control shaft
- 03 Lever
- 04 Lever
- 05 Cylindrical torsion spring
- 06 Connection piece
- 07 Bearing bracket
- 08 Connecting rod from A-bank
- 09 Injection pump
CONNECTION BARS FOR CONTROL SHAFTS
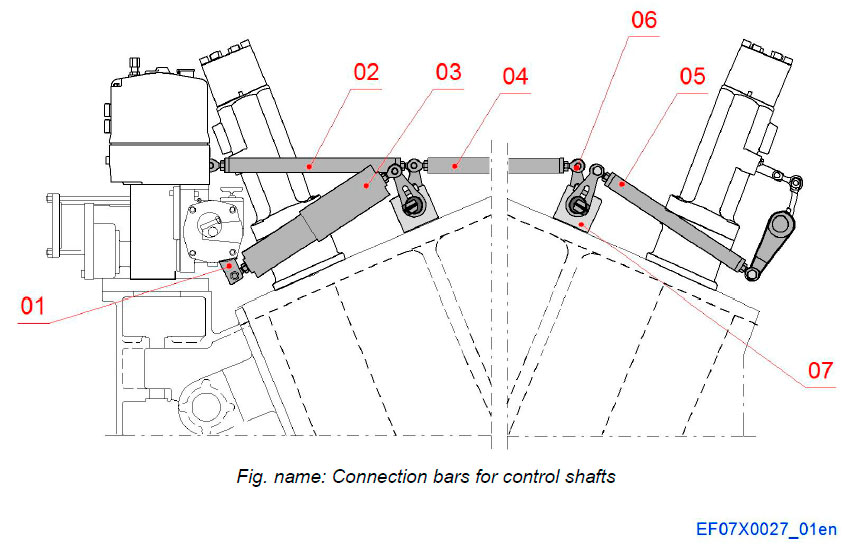
Control shafts of the cylinder banks A and B are connected with connection rods in such a way, that the two control shafts work synchronously together.
System components
- 01 Lever
- 02 Connecting rod
- 03 Spring loaded rod
- 04 Connecting rod
- 05 Connecting rod
- 06 Lever
- 07 Bearing housing
Governing system
GOVERNING SYSTEM ARRANGEMENT
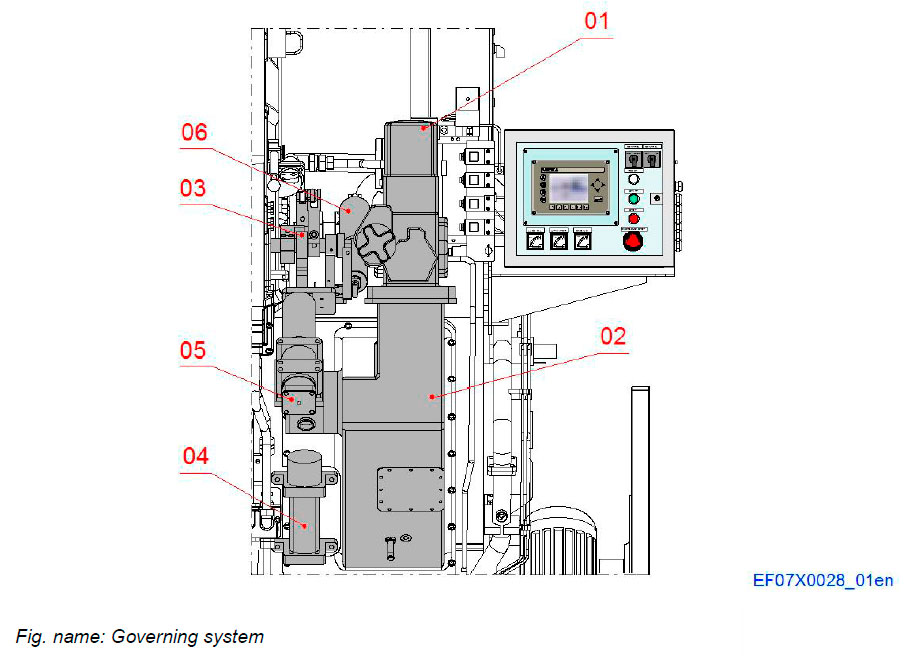
The actuator (01) is used to control the engine speed and thus enable the engine to respond to changing load requirements. Inside the support of the governor drive(02) there are some gears that transfer the motion of the camshaft (engine speed) to the governor. The spring-loaded rod (06), levers and link bars (03) connected to the actuator are part of the governing arrangement; they are the prime movers of the control shaft assembly. The booster servomotor (04) supplies pressurized oil to the actuator at the moment the engine is started.
System components
- 01 Actuator
- 02 Governor drive
- 03 Levers and link bars
- 04 Booster servomotor
- 05 Mechanical over speed trip device
- 06 Elastic link rod
GOVERNING SYSTEM ARRANGEMENT
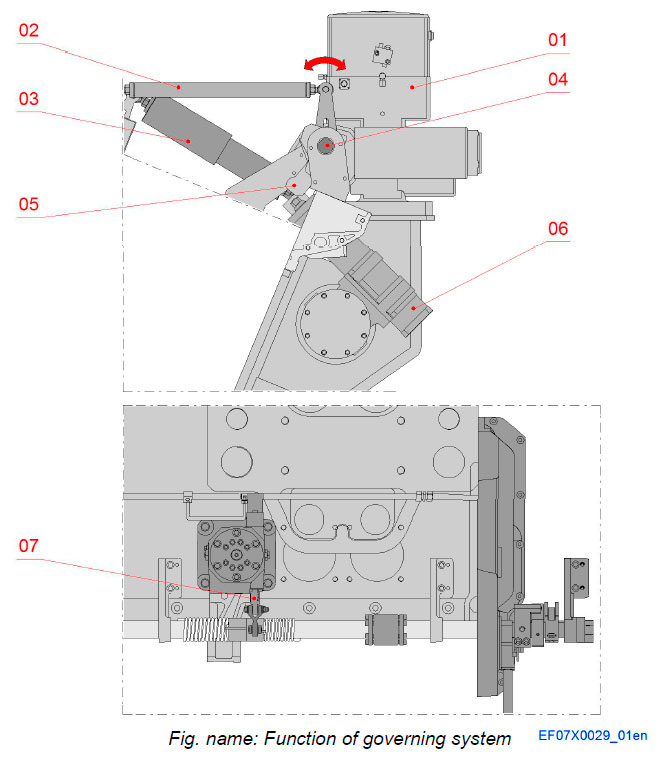
The actuator (01) control the engine speed, which varies according to injection pump control rack (07) position. The control rack moves accordingly the levers and spring loaded rod (03) connected to the actuator. The actuator controls the quantity injection pumps. The actuator is mechanically connected to B-bank with connecting rod (02).
System components
- 01 Actuator
- 02 Connecting rod to B-bank
- 03 Spring loaded rod
- 04 Quantity control shaft
- 05 Shaft lever
- 06 Mechanical over speed trip device
- 07 Control rack
ACTUATOR
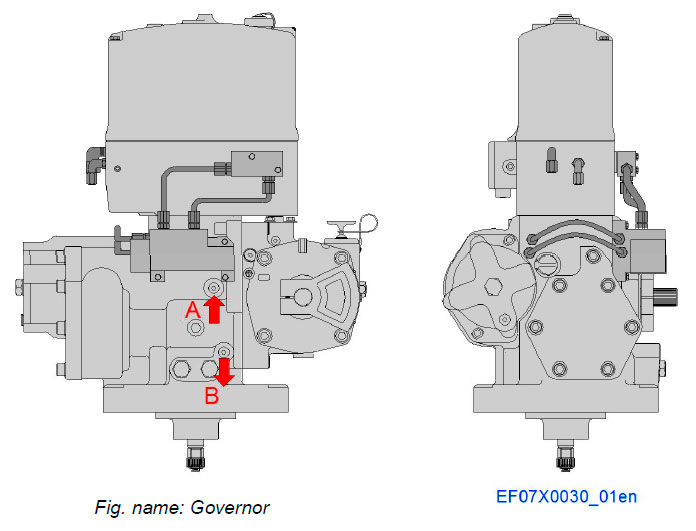
The actuator controls engine speed by regulating the amount of fuel supplied to the prime mover. Speed control can be isochronous (the governor maintains a constant steady state speed, within the capacity of the unit, regardless of load), or with droop (speed decreases as load increases).
Pipe connections
- A Oil outlet 1, from booster
- B Oil inlet, to booster
BOOSTER SERVOMOTOR
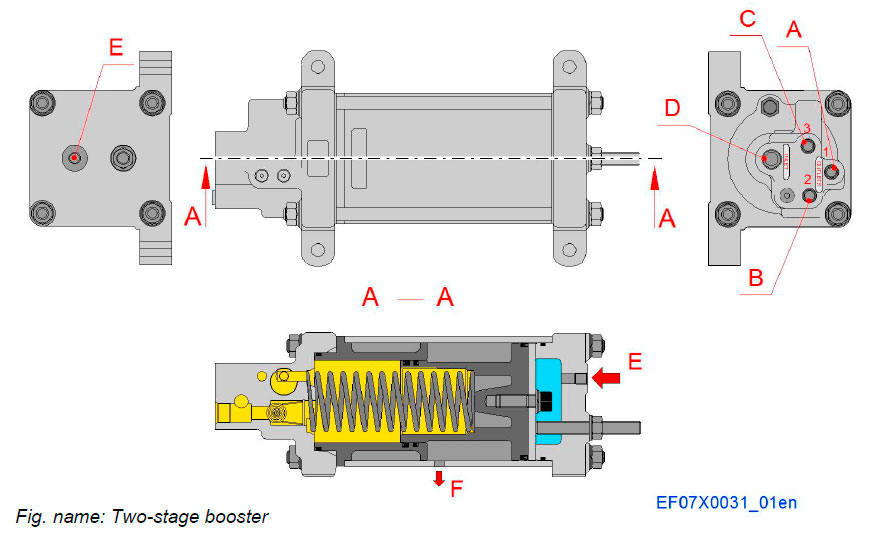
Two-stage boosters have three oil outlets, but a twostage feature allows oil to flow through outlet B before it flows through the other two outlets.
In most applications, outlet A supplies oil to the power piston in the governor. Outlet B supplies oil to the speed setting servo (of PGA, PGPL, and PGG governors equipped with any shut down feature). Outlet C supplies oil to the relay piston.
A booster servomotor supplies pressurized oil to mechanical-hydraulic governors at the instant starting air reaches the engine. This instant oil pressure eliminates the time required for the rotary gear pump in the governor to build up enough oil pressure to move the linkage. This produces a faster start, which conserves starting air.
BOOSTER SERVOMOTOR
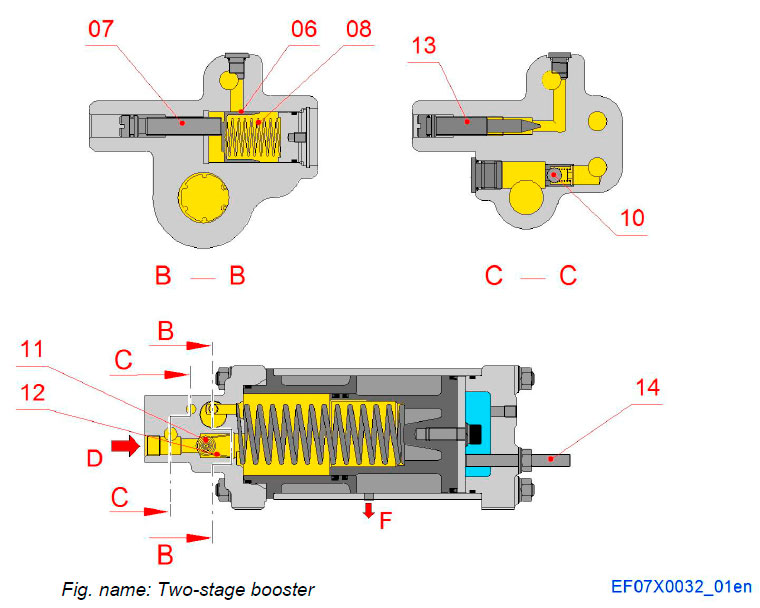
System components
- 06 Shuttle piston
- 07 Shuttle piston adjusting screw
- 08 Spring
- 13 Needle valve
- 10 Check valve assembly D1
- 11 Check valve D2
- 12 Ball check spring
- 14 Stroke limit screw
Pipe connections
- A Oil outlet 1
- B Oil outlet 2
- C Oil outlet 3
- D Oil inlet from governor
- E Air connection
- F Vent
BOOSTER SERVOMOTOR
FIRST PHASE OF OPERATION
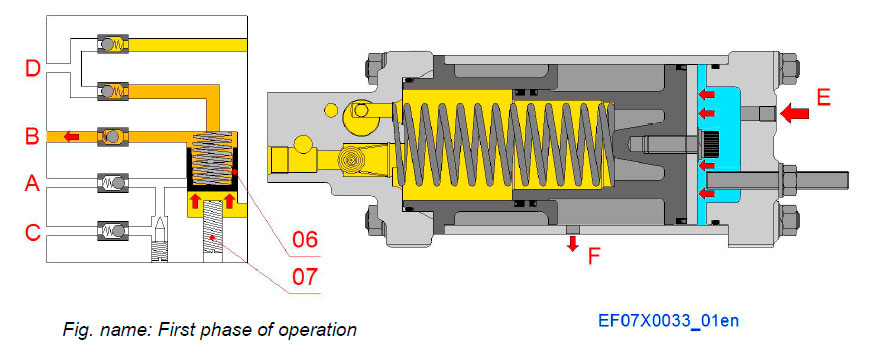
When compressed air enters the booster, the piston moves left, forcing oil to the shuttle piston cavity and moving the shuttle piston up. The shuttle piston forces oil through oil outlet B and blocks oil outlets A and C.
The shuttle piston adjusting screw limits the stroke of the shuttle piston, which limits the amount of oil supplied through oil outlet B.
System components
- 06 Shuttle piston
- 07 Shuttle piston adjusting screw
Pipe connections
- A Oil outlet 1
- B Oil outlet 2
- C Oil outlet 3
- D Oil inlet from governor
- E Air pressure
- F Vent
BOOSTER SERVOMOTOR
SECOND PHASE OF OPERATION
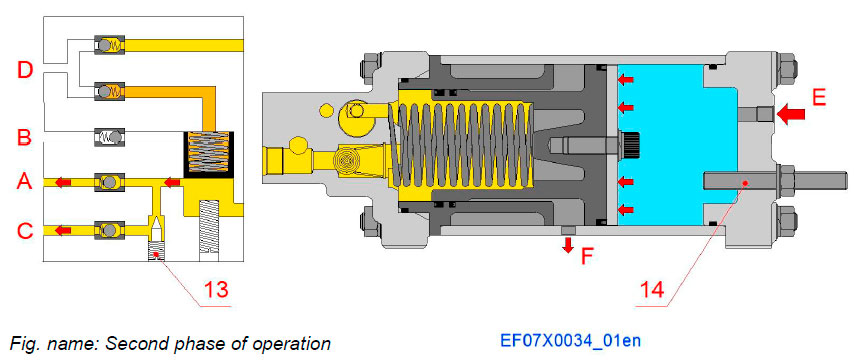
When the shuttle piston reaches the end of the stroke, it uncovers the passage to outlets A and C, and oil flow through outlet B ceases. Oil remaining in the booster flows through outlets A and C to the relay and power pistons in the governor, moving them to increase fuel.
The needle valve in outlet C limits the amount of oil that goes through this outlet and its rate of flow. This, in turn, limits the stroke of the power piston in the governor and the rate at which fuel is supplied to the engine.
The stroke limit screw limits the stroke of the main booster piston, which limits the total amount of oil supplied to the governor by the booster.
Check valves prevent oil from flowing from the booster into the governor’s sump.
System components
- 13 Needle valve
- 14 Stroke limit screw
Pipe connections
- A Oil outlet 1
- B Oil outlet 2
- C Oil outlet 3
- D Oil inlet from governor
- E Air pressure
- F Vent
BOOSTER SERVOMOTOR
THIRD PHASE OF OPERATION
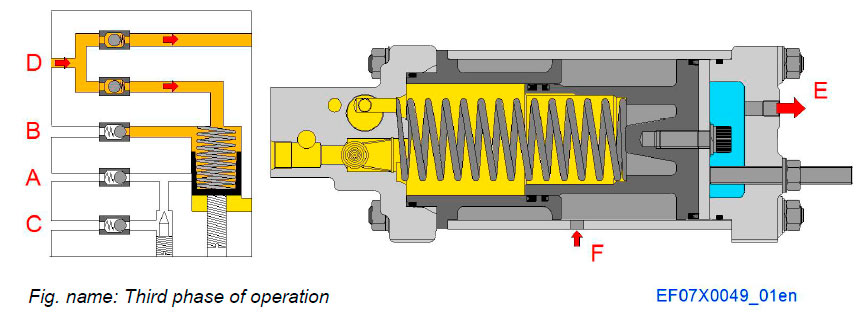
When starting air is removed, the booster is vented to atmosphere through the starting-air valve (customer supplied) in the booster's air line. Spring force returns the booster's pistons to the original position. Oil stops flowing out of the booster. Reduced pressure in the booster causes sump oil to flow back into the booster.
The booster is ready to start again.
Check valves in the oil outlets prevent oil from flowing back through the oil outlets into the booster.
Pipe connections
- A Oil outlet 1
- B Oil outlet 2
- C Oil outlet 3
- D Oil inlet from governor
- E Air pressure released
- F Vent
MECHANICAL OVER SPEED TRIP DEVICE
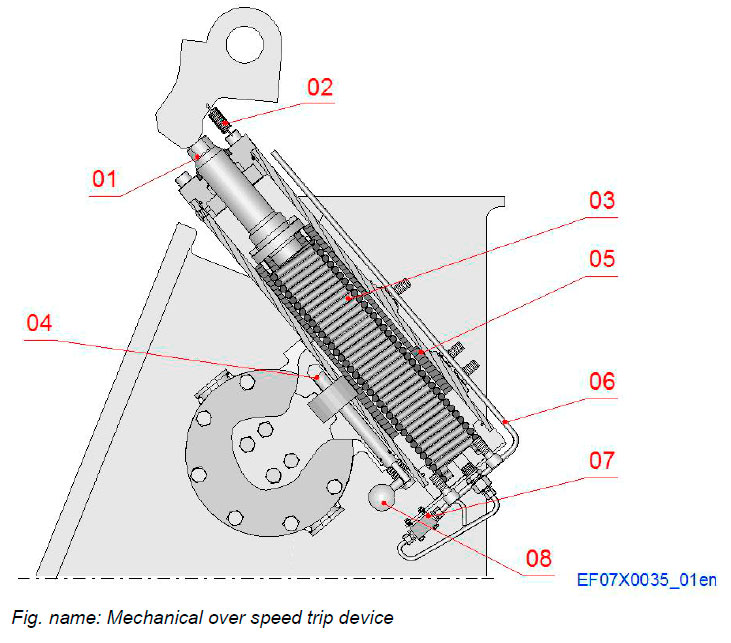
A mechanical over speed trip device provides a stop function for the speed governor by which the engine can be stopped remotely. The mechanical over speed trip device’s function bases on the centrifugal forces developed by the engine which actuates the lever moving forcing the shaft to stop position. It can be also tripped by manually.
System components
- 01 Spindle
- 02 Draw spring
- 03 Working spring
- 04 Shaft
- 05 Piston
- 06 Air pipe
- 07 Valve
- 08 Lever
MECHANICAL OVER SPEED TRIP DEVICE
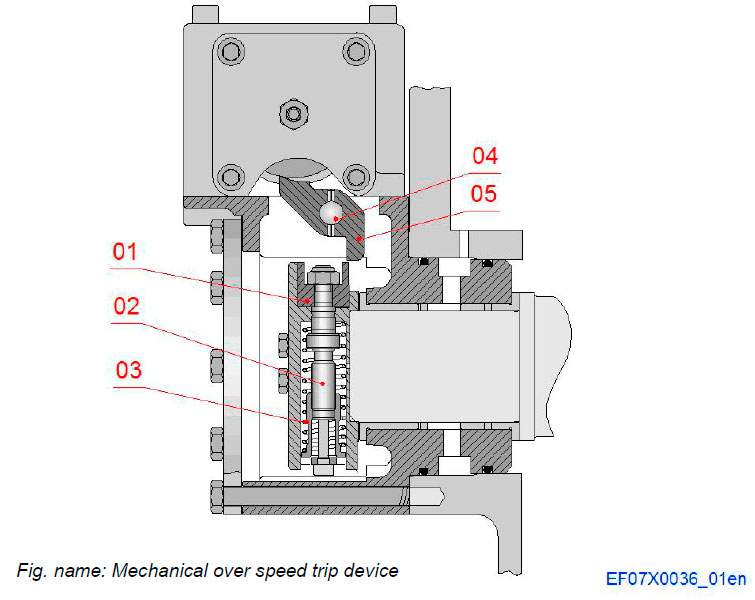
The trip mechanism is fastened to the camshaft end. Increasing engine speed causes increasing centrifugal force on the trip mechanism and exceeds the force of the spring at the set trip speed. Function moves the weight outwards forcing the hasp to turn which releases the spindle from the working spring’s dominating spring force.
Function also releases the lever which activates the pneumatic valve causing air pressure flowing to cylinder providing the piston to move as quickly as possible.
System components
- 01 Weight
- 02 Spindle
- 03 Spring
- 04 Spring pin
- 05 Hasp
ACTUATOR DRIVE ASSEMBLY
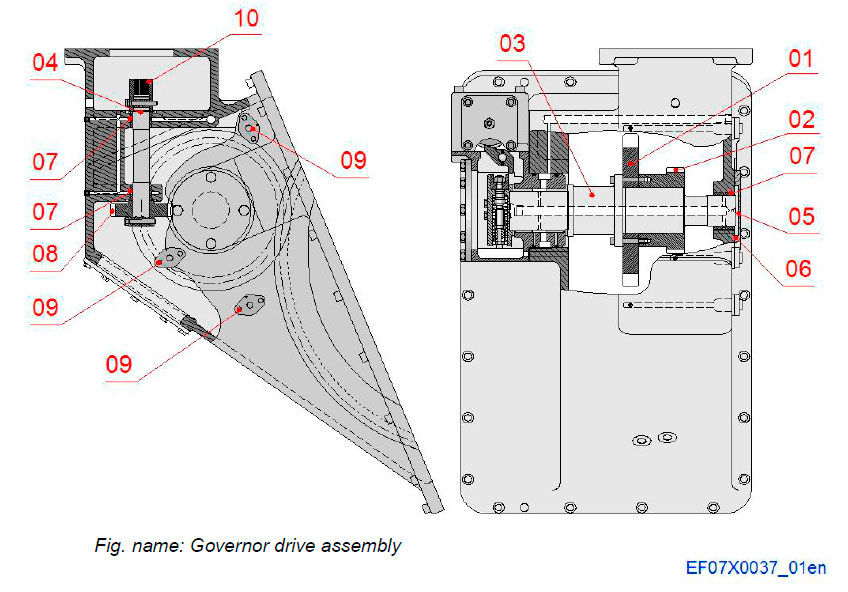
The governor is driven by a separate drive unit, which, in turn, is driven by the camshaft through intermediate gear (01) and helical gears (02) and (08).
The governor is fastened to governor drive and connected to the vertical drive shaft through a serrated connection sleeve (10).
System components
- 01 Intermediate gear wheel
- 02 Helical gear
- 03 Horizontal shaft
- 04 Vertical shaft
- 05 Cover plate
- 06 O-ring
- 07 Bearing bush
- 08 Gear for governor drive shaft
- 09 Lubricating oil nozzle
- 10 Connection sleeve
Control air system arrangement - Internal
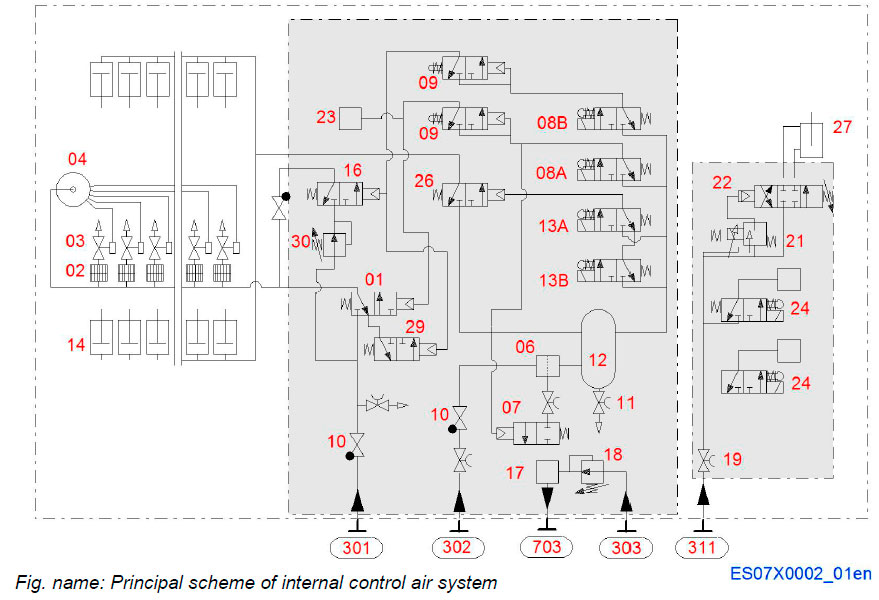
System components
- 01 Main starting valve
- 02 Flame arrester
- 03 Starting air valve in cylinder head
- 04 Starting air distributor
- 06 Air filter
- 07 Water outlet valve
- 08A Solenoid valve for starting
- 08B Solenoid valve for slow turning
- 09 Blocking valve for turning gear
- 10 Non-return valve
- 11 Drain valve
- 12 Air container
- 13A Solenoid valve for stopping
- 13B Solenoid valve for emergency stopping
- 14 Pneumatic stopping cylinders
- 16 Slow turning valve
- 17 Oil mist detector
- 18 Pressure regulator
- 19 Shut-off valve
- 21 I/P converter for waste gate positioner
- 22 Exhaust waste gate positioner
- 23 Booster servomotor for governor
- 24 Solenoid valve for gas venting
- 26 Stop valve
- 27 Waste gate valve
- 29 Drain valve
- 30 Pressure regulator
Pipe connections
- 301 Starting air inlet
- 302 Control air inlet
- 303 Control air to oil mist detector
- 311 Control air inlet to waste gate and gas venting valves
- 703 Oil mist detector outlet
Control air system on engine
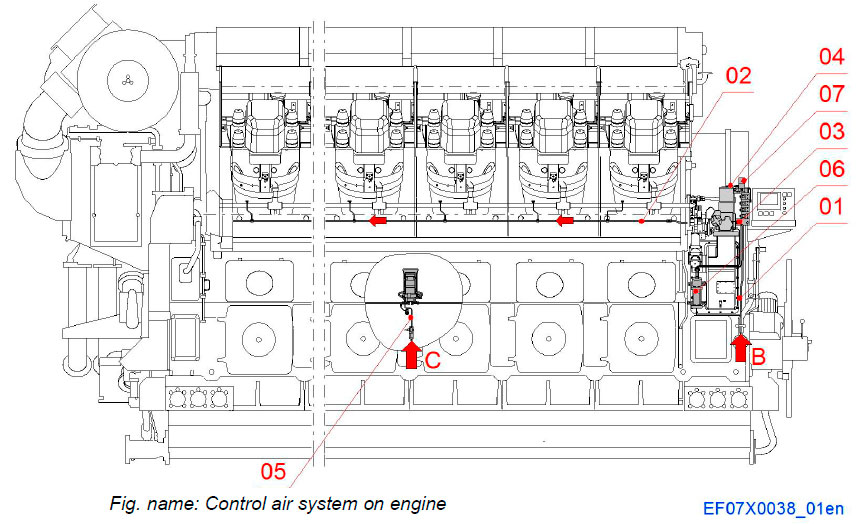
System components
- 01 Control air delivery piping
- 02 Air pipes for stop cylinders
- 03 Water outlet valve
- 04 Air filter
- 05 Control air for oil mist detector
- 06 Booster servomotor for governor
- 07 Control air piping at driving end
Connections
- B 302 Control air inlet
- C 303 Control air to oil mist detector
Control air piping at driving end
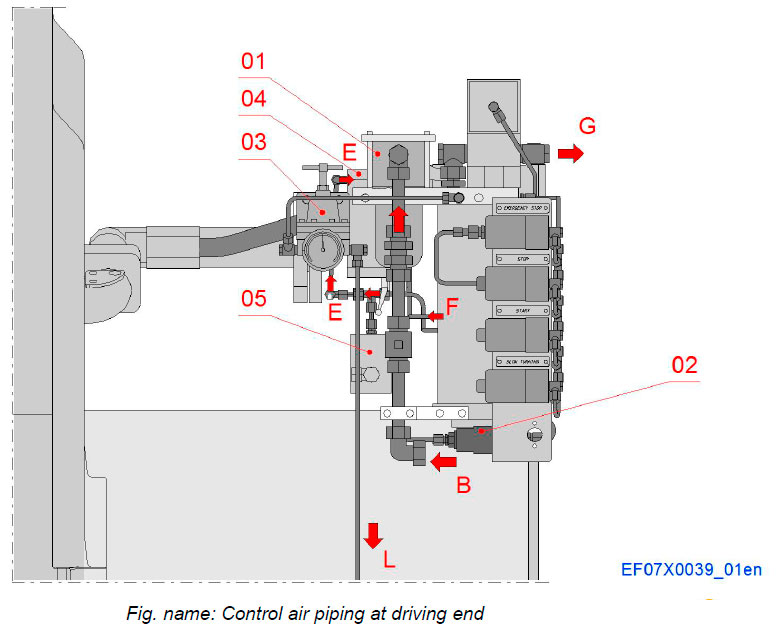
System components
- 01 Air filter
- 02 Water outlet valve
- 03 Pressure regulator
- 04 Slow turning valve
- 05 Drain valve
Pipe connections
- B Control air inlet
- E Control air for slow turning
- F Control air for starting
- G Control air to pneumatic stop cylinders
- L Pressure air to mechanical over speed device
Control valves for starting and slow turning
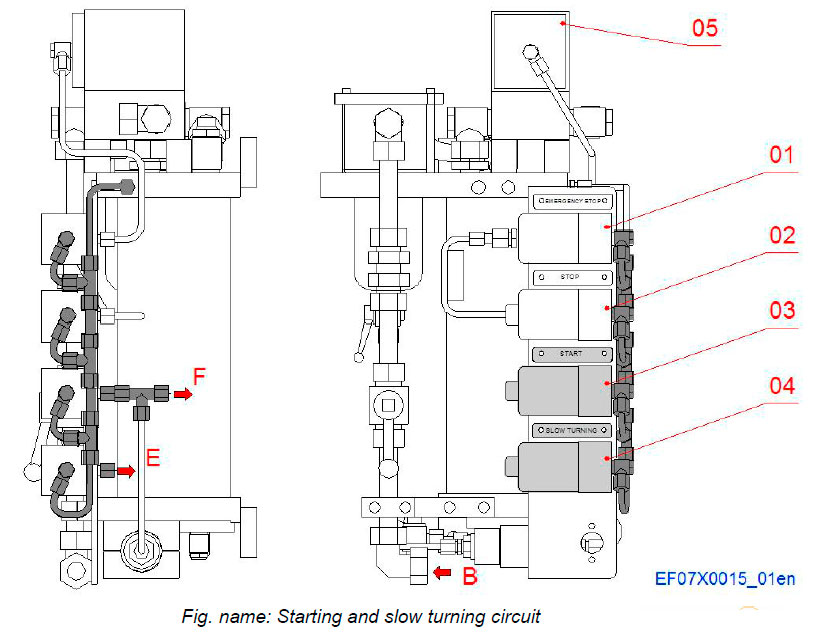
Starting and slow turning 3/2 solenoid valves controls function of main starting valve with slow turning. Control air circuit is different as the starting air supply and flows through the air container. The valves are electronically controlled but manually operation is possible through a button over the valves.
Slow turning engine function is automatically activated when the engine has been stopped for more than 30 minutes: the engine makes a pair of revolutions before starting function is activated.
System components
- 01 Stop-shut down valve
- 02 Stop-shut down valve
- 03 Valve for starting
- 07 Valve for slow turning
- 05 Stop valve
Pipe connections
- B Control air inlet
- E Control air for slow turning
- F Control air for starting
Control valves for pneumatic stop cylinders on injection pumps
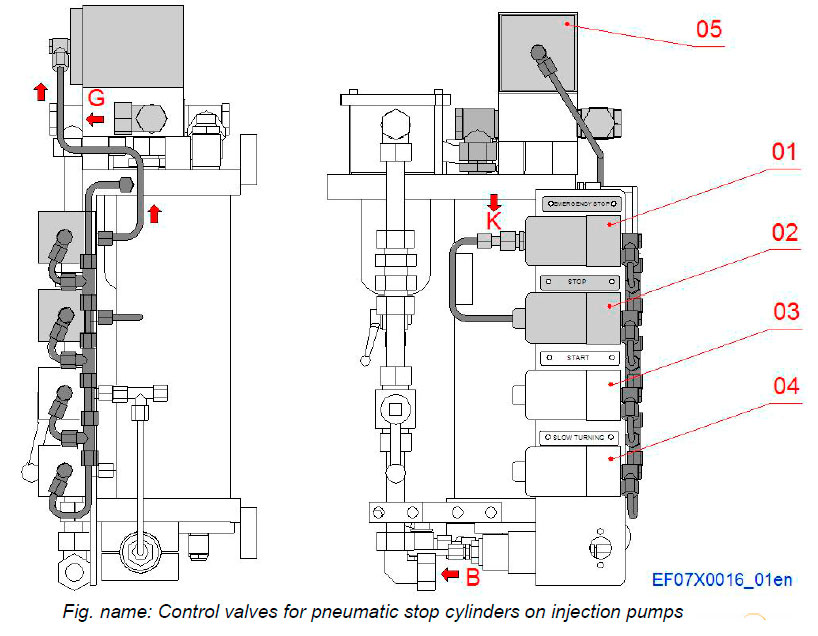
The pneumatic cylinders are controlled by two of 3/2 way control valves (01) ( 02) connected to the air container, which is situated end cover casting. The valves are electronically controlled but manually operation is possible through a button over the valves.
System components
- 01 Stop-shut down valve
- 02 Stop-shut down valve
- 03 Valve for starting
- 04 Valve for slow turning
- 05 Stop valve
Pipe connections
- B Control air inlet
- G Control air to pneumatic stop cylinders
- K To open air
Control air to stop cylinders
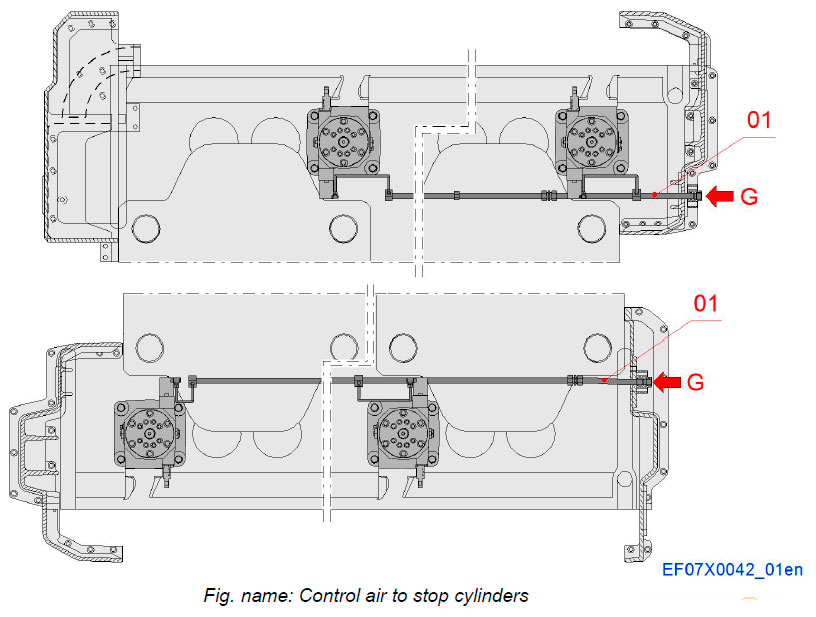
The pneumatic stop cylinders are electronically controlled by the stop button. When 3/2 control valves are activated, let the air flow through the air block to the pneumatic stop cylinders on the injection pumps.
System components
- 01 Control air pipe
Pipe connections
- G Control air to pneumatic stop cylinders
Control air conditioning
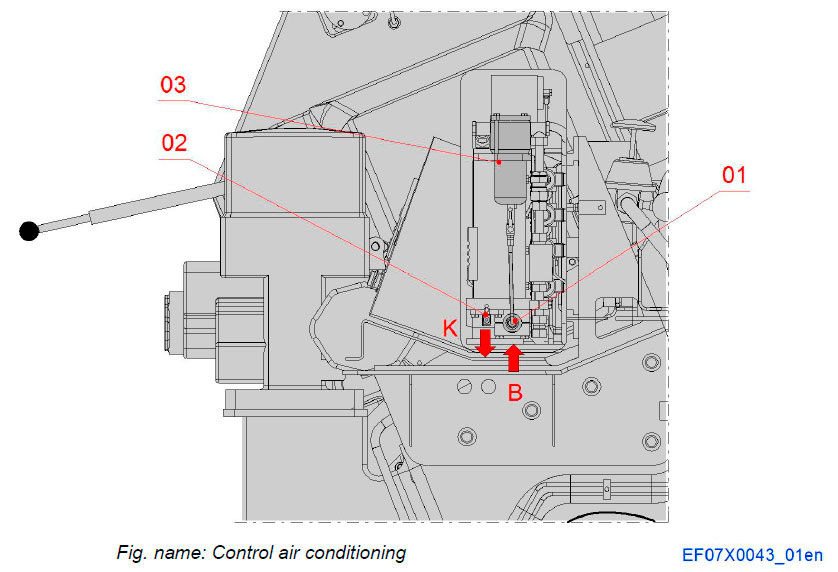
The high pressure air filter (03) and the water outlet valve (01) are situated at control air inlet pipe line.
The high pressure filter prevents impurities from entering the control air system. This is necessary for trouble free operation and it also gives a longer life cycle to the control valves. The water outlet valve is pressure controlled. The control air for the draining operation is supplied from the starting control air line before blocking valve. At the engine starting function, the condensate water is automatically drained out from the high pressure filter.
System components
- 01 Water outlet valve
- 02 Water drain valve
- 03 Air filter
Pipe connections
- K To air
- B Control air inlet
Control air to booster
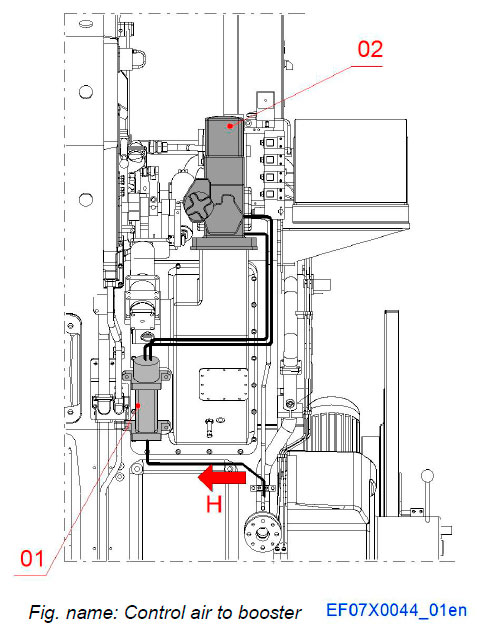
Control air supply line connection for booster servomotor is situated at starting air control line before main starting valve after blocking valve.
System components
- 01 Booster servomotor
- 02 Actuator
Pipe connections
- H Control air to booster servomotor
Blocking valve for turning gear
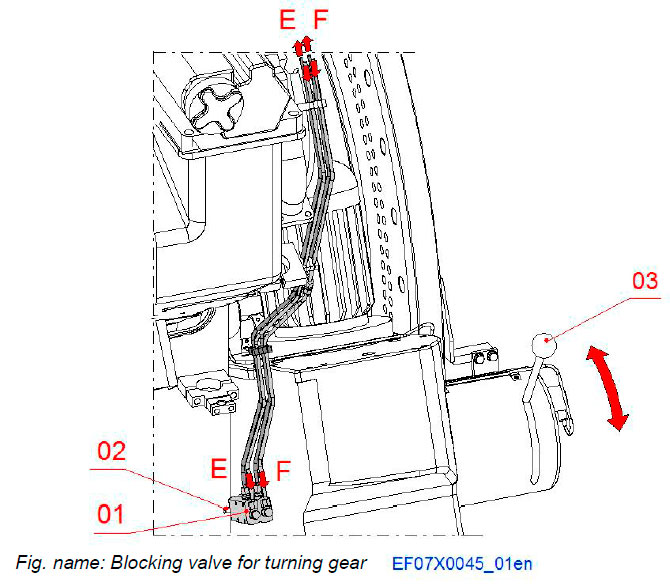
The blocking valves are situated on turning device, and are part of it. The valves are connected to the main starting valve with slow turning and starting air control circuits.
The blocking valves prevent slow turning and starting of the engine in case the turning device is engaged to flywheel.
System components
- 01 Blocking valves for turning gear
- 02 Shaft
- 03 Lever
Pipe connections
- E Control air for slow turning
- F Control air for starting
Control air pipes for gas venting system
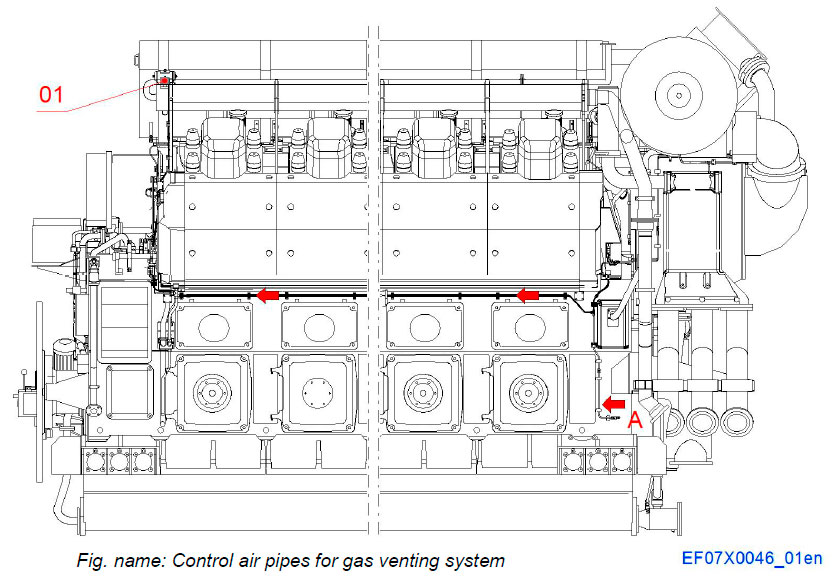
The working air is directly supplied to gas venting valve.
The control air to gas venting valve is supplied directly to solenoid valve, situated at the valve actuator.
Solenoid valve controls the movement of open and closed position of the valve.
System components
- 01 Solenoid valve
Pipe connections
- A Control air to waste gate and solenoid valve
Control air pipes for waste gate and by-pass system
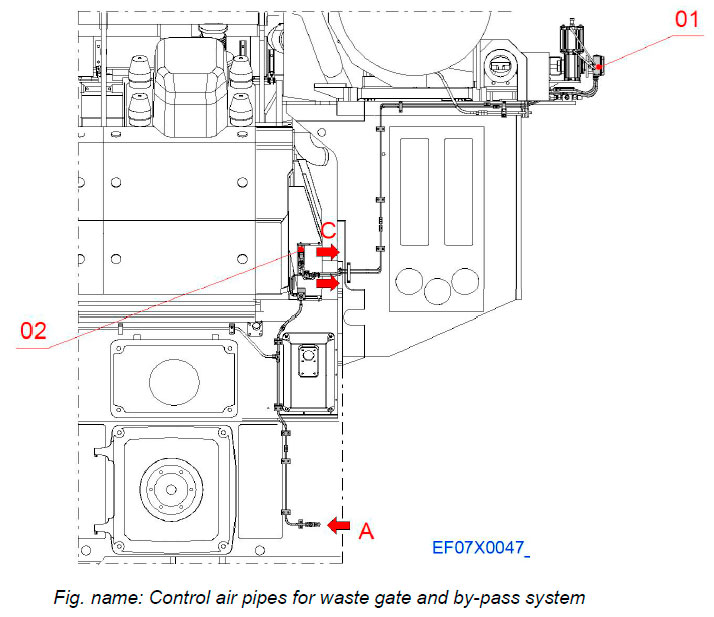
The working air is directly supplied to Waste gate valve.
The control air signal to positioner of waste gate valve is supplied from the I/P converter. The control signal controls the movement of the valve between closed valve and fully open valve.
System components
- 01 Posiotioner
- 02 I/P converter for waste gate valve
Pipe connections
- A Control air to waste gate and solenoid valve
- C Control air from I/P converter to waste gate valve
Oil mist detection system
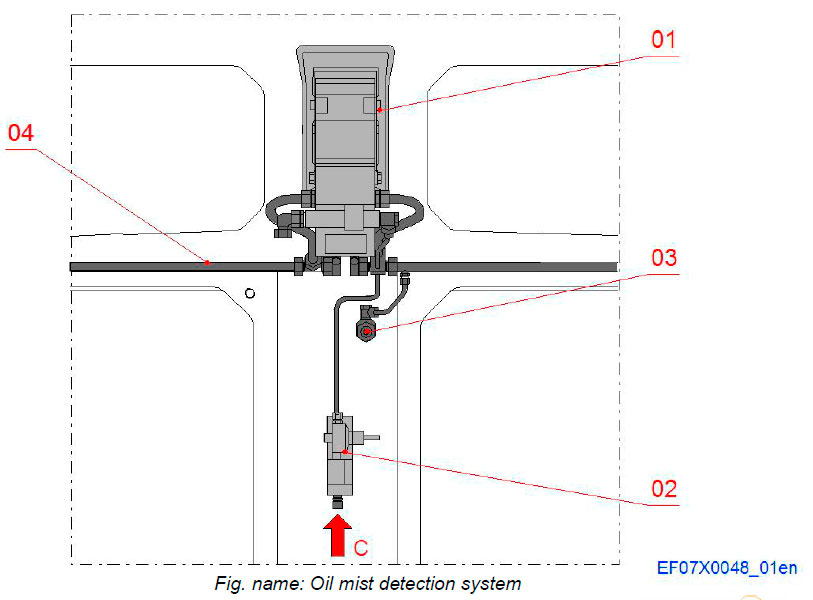
Oil mist detection system protects the engine against serious damages originating from main bearing shells or piston components (eg. bearing shells, gudgeon pin) overheating. The atmosphere of the crankcase is continuously drawn out by means of a labyrinth cup and directed through an optical opacity measuring track. In this measuring track the opacity of the drawn crankcase atmosphere is determined by means of infrared light.
System components
- 01 Oil mist detector
- 02 Pressure regulator
- 03 Sampling funnel
- 04 Suction pipe
Pipe connections
- C 303 Control air to oil mist detector
Литература
www.wartsila.com

