Otto Diesel’s original patent application for what we now know as a diesel engine was pretty vague about the kind of fuel it might use: he even suggested coal dust as a possibility. Some boatowners seem almost equally vague: every year lifeboats have to tow in boats that have simply run out of fuel!
There’s more to getting fuel into an engine, however, than simply pouring the stuff into the tank.
Diesel fuel doesn’t burn very easily, and in order to burn quickly, cleanly and reliably it has to be in the form of fi ne droplets, like an aerosol spray. You’ll remember from the previous chapter that the air in a diesel’s cylinders is made hot by being compressed to 20 or 30 times its normal atmospheric pressure, so producing an aerosol spray inside the cylinders means that the fuel has to be at an even higher pressure – in the order of 2,500 psi.
It’s also essential for the proportions of fuel and air to be exactly right, so each squirt of fuel has to be very accurately measured. If you think of a typical four-cylinder diesel developing 80 hp when it’s running fl at out at 4,000 rpm, it will be burning about 4 gallons of fuel an hour. Each cylinder will be receiving 2,000 squirts of fuel every minute – making 8,000 squirts per minute, or 480,000 squirts per hour. Each squirt, then, must be less than 10 millionths of a gallon, 0.04 ml, or less than a hundredth of a teaspoon. At low loads the amount of fuel sent to the cylinders has to be even less.
It’s hardly surprising, then, that the fuel system includes some of the most sophisticated and expensive parts of the engine, responsible for achieving pressures of almost 200 atmospheres, measuring doses of fuel accurate to less than a thousandth of a millilitre, and repeating the process perhaps half a million times an hour!
The basic system
The fuel system starts, however, with the crudest component of all: the tank. It’s worth bearing in mind that a full tank can be very heavy, so it needs to be well supported and secured against the boat’s motion. A big tank – anything over about 5–10 gallons – should include internal baffl es to stop the fuel sloshing about, and any tank needs a vent, or ‘breather’, to let air in as the fuel is used up.
Unfortunately, the fuel received from the hose may not be perfectly clean, and the air that comes in through the breather will almost certainly be moist enough to allow condensation to form inside the tank. The end result is that the tank will include some dirt and water.
To prevent this reaching the engine, the engine installation should include a component known as a primary fi lter, pre-filter, separator, sedimenter or fi lter-agglomerator, usually mounted on a bulkhead in the engine compartment rather than on the engine itself.
The lift pump is responsible for pulling the fuel out of the tank, through the primary fi lter, and passing it on to the rest of the system. In most cases, it’s a simple diaphragm pump, very much like a miniature version of a manual bilge pump. It’s driven by the engine, but usually has a hand-operated priming lever so that you can pump fuel through the system without running the engine.
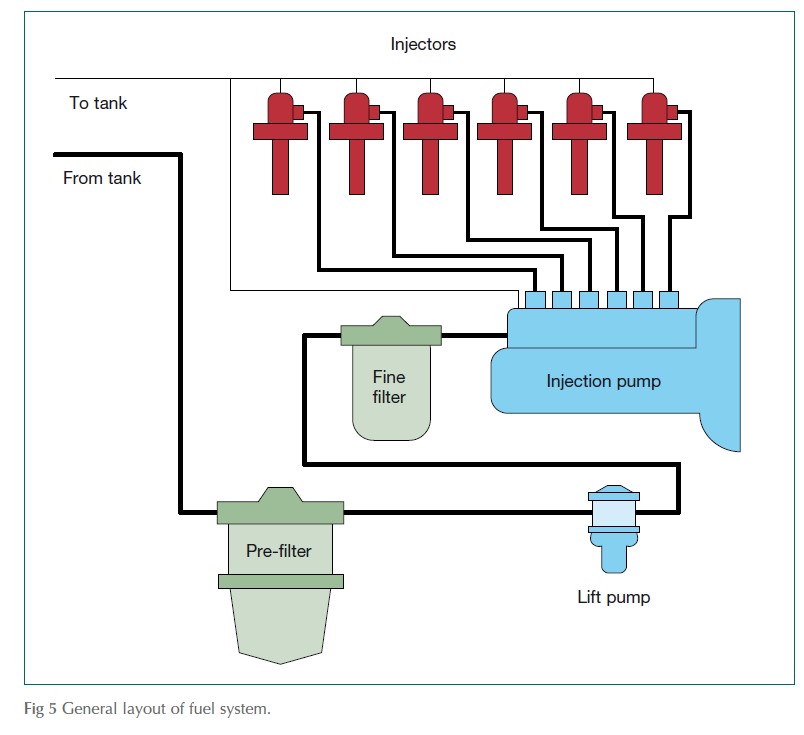
The fuel then passes through another filter, sometimes known as the main filter or secondary filter or fine filter, whose job is to remove particles of dirt that – at less than a thousandth of a millimetre in diameter – may be too small to see, but that are still capable of wearing the very finely engineered surfaces of the rest of the system.
If a diesel engine has a ‘heart’, it has to be the injection pump, because this is where the fuel is measured and pressurised.
Injector pipes, with very thick walls to withstand the pressure, carry the highly pressurised fuel from the injection pumps to the injectors that spray it into the cylinders.
Some of the fuel that is pumped to the injectors, however, never actually reaches the cylinder but is returned to the tank through a leak-off pipe, or return line.
THE SINGLE-ELEMENT INJECTION PUMP
There are three main types of injection pump, of which the simplest is the kind found on singlecylinder engines. Even if you have a multicylinder engine, it’s worth knowing a bit about the single-element ‘jerk’ pump, because many multi-cylinder engines use derivatives of it.
The principle is much like that of a bicycle pump or an old-fashioned bilge pump, with a piston (usually called the plunger) moving up and down inside a cylinder. A hole called the spill port in the side of the cylinder allows fuel to fl ow into the cylinder when the plunger is at the bottom of its travel. As the plunger rises, however, it covers the port to shut off the fl ow and trap some fuel in the cylinder. As it continues to rise, the trapped fuel has to go somewhere, so it escapes by lifting the delivery valve off its seat, and fl owing out into the injector pipe.
Principle of the jerk pump
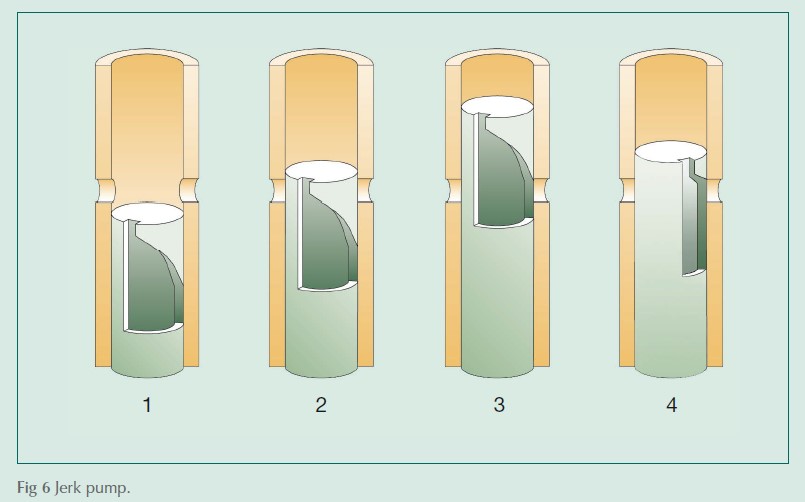
1. When the plunger is at the bottom of its travel, fuel fl ows into the pump cylinder through one of the ports.
2. As the plunger rises, it blocks off the ports and pressurises the fuel, driving it out of the top of the pump cylinder.
3. As the piston rises further, the helical cut-out reaches the spill port: fuel can fl ow down the groove and out through the spill port. The pressure is released so no more fuel reaches the injector.
4. Rotating the plunger means that the cut-out reaches the spill port at an earlier stage in the plunger’s travel. The effective stroke of the plunger is shortened, so less fuel is delivered.
KEY
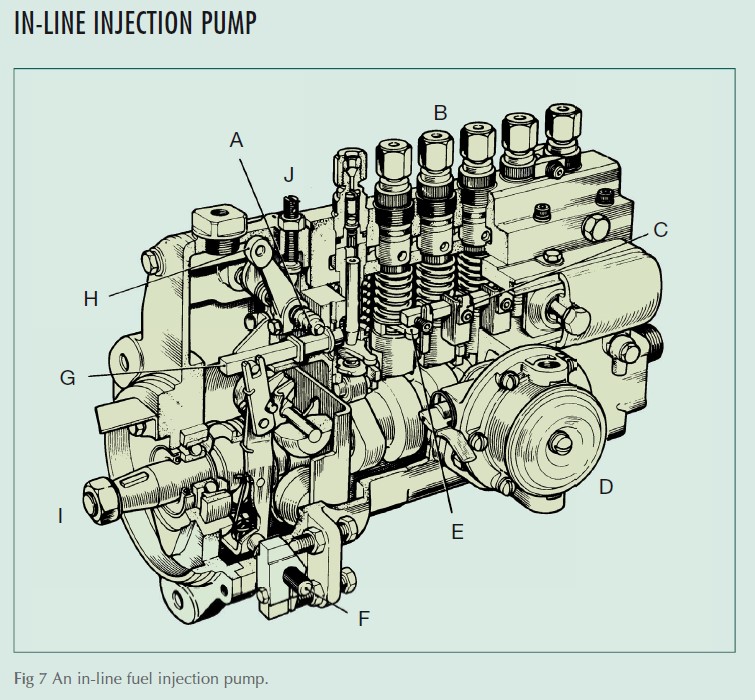
- A. Excess fuel button for cold starting.
- B. High pressure fuel line connectors that feed the injectors. Six in this case for a six-cylinder engine.
- C. Control fork that moves levers on the plunger arm on each pump to control the quantity of fuel injected.
- D. This model has the low pressure fuel pump built on to the side of the injection pump. This is a diaphragm type driven from the injection pump’s camshaft rather than from the main engine camshaft.
- E. The actuating arm that along with C moves the pump element to control the amount needed for injection at various engine speeds.
- F. Control lever connected by cable to the helm position.
- G. Control rod assembly, which is moved by F and a combination of the excess fuel device, the engine governor and the stop control to provide exactly the right control of the pumping elements to suit the particular running or stopping conditions.
- H. Stop lever.
- I. Cam and roller cam followers, which drive the pumping elements. This is a pump that requires the gallery to be topped up with engine oil for the internal lubrication of the moving parts.
- J. Maximum fuel stop screw, usually has a seal placed through it to prevent tampering.
The measuring part of the fuel pump’s job is taken care of by a spiral-shaped cut-out in the side of the plunger. As the piston nears the top of its travel, the spiral cut-out eventually comes level with the spill port in the side of the cylinder, allowing fuel to flow round the spiral and out of the spill port.
Pushing or pulling on a toothed rod called the rack makes the plunger rotate, so the spiral can be made to uncover the spill port at any stage in the plunger’s stroke, varying the amount of fuel that is delivered without having to change the distance the plunger actually moves.
This is significant, because the up-and-down movement of the plunger is achieved by the action of a cam, very similar to the cams that operate the valves in the engine’s cylinder head.
It’s worth noting that thin metal packing pieces called shims are usually fitted between the base of the pump and the cylinder block or crankcase. Increasing the number of shims raises the pump body, so the ports are higher, which means that the pump doesn’t start delivering fuel until slightly later in the cycle. In other words, the number and thickness of the shims has a critical effect on timing – the moment at which fuel is sprayed into the cylinder – so if you remove the fuel pump for any reason, it’s essential to make sure that you retain all the shims and put them back when the pump is re-installed.
THE IN-LINE INJECTION PUMP
A few multi-cylinder engines use a separate single-element fuel pump for each cylinder, but it’s more common to find all the separate elements combined into a single component that looks rather like a miniature engine. It’s called an in-line pump because it consists of several jerk pumps in line, driven by a camshaft in the pump body instead of in the engine block.
THE ROTARY INJECTION PUMP
The rotary or DPA injection pump is lighter, more compact, and can cope with higher engine speeds than the in-line type, so it’s eminently suitable for small, high-revving engines. Unfortunately, it’s also more vulnerable to dirty or contaminated fuel and – unlike an in-line pump that may fail on one or two cylinders but keep going on the others – a DPA pump that goes wrong will often pack up altogether.
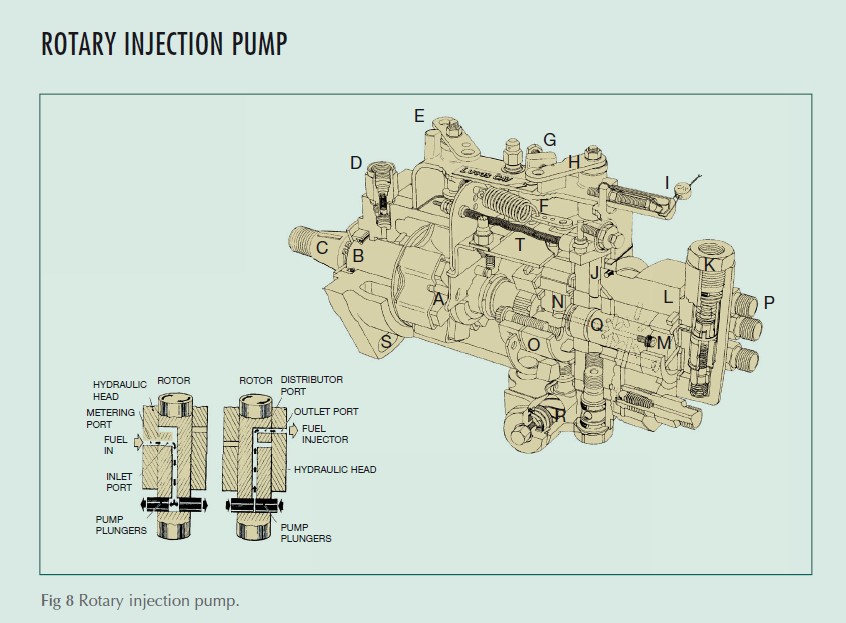
The reason for this ‘all-or-nothing’ operation is that a DPA pump consists of a single high pressure pump, distributing fuel to each injector in turn through a spinning rotor.
The lift pump supplies fuel to the injection pump at one end, where a vane-type transfer pump – similar in principle to the engine’s rawwater pump – increases its pressure. The fuel then flows to the high pressure pump through the metering valve, which controls the amount of fuel that will be delivered to the engine’s cylinders.
The high pressure pump consists of two small plungers built into a rotor. Fuel from the metering valve flows into the space between the two plungers, forcing them to move apart. As the rotor turns, however, bulges on the cam ring that surrounds it force the plungers back inwards.
Fuel, now at very high pressure, is driven out of the space between the plungers and through a drilling in the rotor, which directs it to each injector pipe in turn.
INJECTORS
The injectors convert the tiny squirts of high pressure fuel into an atomised spray in the cylinders. They are usually cylindrical in shape, about 6 in (15 cm) long and 1 in (25 mm) in diameter, but are clamped into the cylinder head so that only a couple of inches of the injector body and a couple of pipe connections are visible.
KEY
- A. Centrifugal governor weights provide sensitive speed control.
- B. Front bearing oil seal and retaining circlip.
- C. Tapered drive shaft.
- D. Back leak connection feeds excess fuel that has also helped lubrication of the pump back to the fuel fi lter.
- E. Shut off lever, hand operated by cable control.
- F. Return spring to hold speed control lever against idle stop.
- G. Idling speed control stop.
- H. Speed control lever usually connected to helm position by cable control system.
- I. Maximum speed stop and adjusting screw sealed to prevent tampering.
- J. Fuel metering valve, governor controlled.
- K. Low pressure fuel inlet with nylon fi lter below it.
- L. The stationary hydraulic head, which houses the transfer pump (M) and the distributor rotor (Q).
- M. The transfer pump, which transfers low pressure fuel from inlet (M) to high pressure plungers (N) via metering valve (J).
- N. High pressure pump plungers are driven outwards by fuel pressure from (N) and pushed inwards by the lobes on the cam ring (O).
- O. Cam ring.
- P. High pressure outlet pipe connections to injectors.
- Q. The distributing part of the rotor contains a central axial passage (dotted) and two radially drilled ports. The distributing port aligns successively with each high pressure outlet port to P, there being one for each cylinder of the engine. A similar number of inlet ports in the rotor align successively with a single port in the head, called the metering port, and admits the fuel from (M) under the control of the governor. See inset.
- R. Fully automatic advance device.
- S. Pump fi xing and locating bolt slot that allows rotation of pump about axis for timing. Score marks across engine and pump fl ange can help re-install pump to same timing position.
- T. Governor spring.
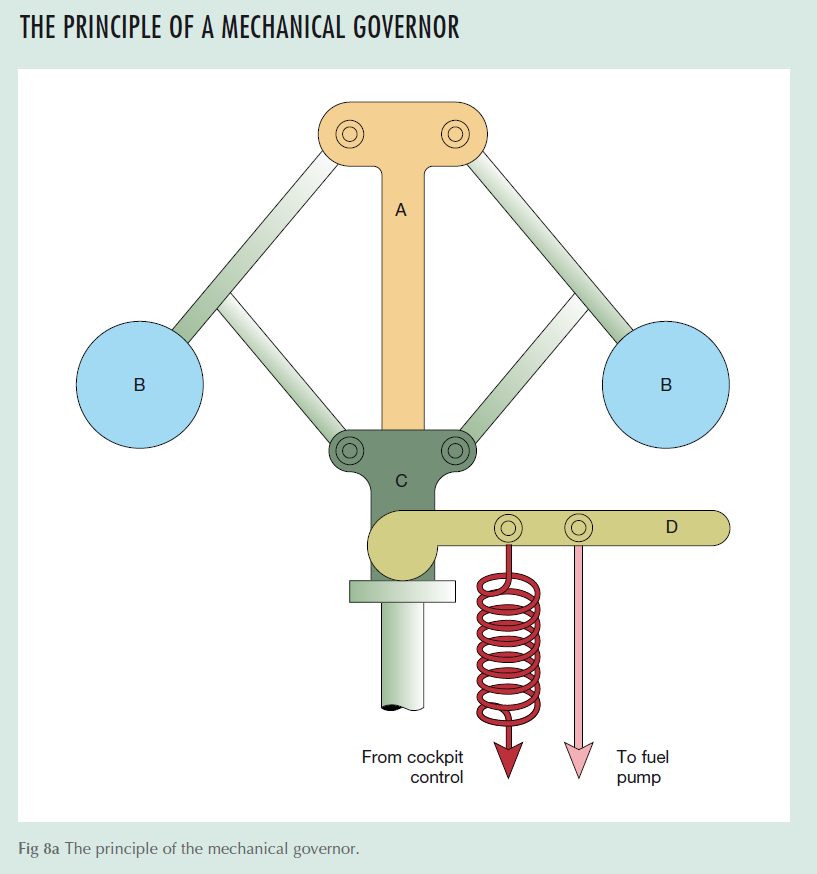
The shaft (A) is driven by the engine, so as the engine speed increases, the weights (B) try to fly outwards. The linkage (C and D) is arranged so that this movement tells the fuel pump to slow the engine down.
The cockpit control is connected to the spring. When the control is pushed forwards, for higher engine speeds, the increasing tension in the spring makes it more difficult for the flywheel weights to slow the engine down, so the engine speed increases.
The balance between the governor weights and the spring tension keeps the engine running at a constant speed, set by the cockpit control, even if the load varies.
The mechancial governor inside a diesel injection pump is more sophisticated than this, but the principle is identical.
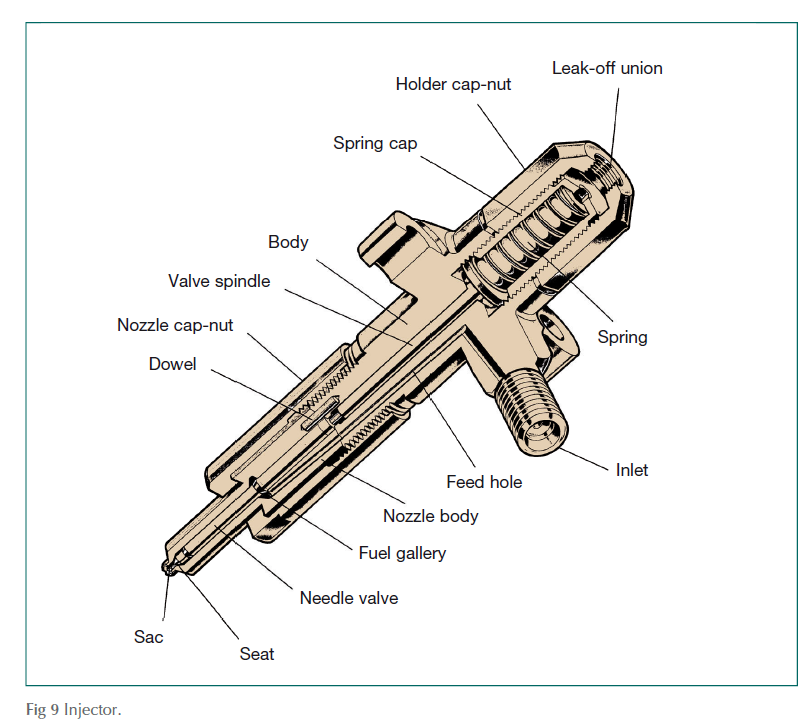
The injector body is basically a tube, almost completely fi lled by a needle valve, push rod, and a strong spring. Fuel from the injection pump enters the side of the injector from the injector pipe, and then fl ows down a narrow passage to the pressure chamber, just above the nozzle.
The nozzle is sealed off by the needle valve, which is held in place by the push rod and spring. When the injector pump delivers one of its pulses of fuel, the pressure within the pressure chamber rises suffi ciently to lift the needle valve off its seat. Fuel then rushes out of the nozzle so quickly that it breaks up into a spray. Of course, this sudden escape of fuel means that the pressure in the pressure chamber drops again, allowing the needle valve to snap back into its seat to stop the fl ow.
Although the movements of the needle valve are very small, they happen so quickly that lubrication is essential. This is achieved by allowing some of the fuel from the pressure chamber to fl ow up the injector, past the needle valve and push rod, and out through the leak-off pipe at the top to return to the tank.
If too much fuel took this route, it would entirely defeat the object of the exercise: the pressure in the pressure chamber would never rise enough to lift the needle valve, so no fuel would get into the cylinder. The fact that it doesn’t is entirely due to the very high precision engineering of the injector, which keeps the clearance between the needle valve and the injector body down to something in the order of 0.001 mm (about 40 millionths of an inch). That’s so small that if you were to strip an injector and leave the body on the bench while you held the needle valve in your hand, your body heat would expand the needle valve enough to stop it going back into its hole!
There are three reasons for mentioning this, of which the first is to make the point that you should never strip an injector: it may look rugged, but it’s so finely engineered that injector servicing is definitely a job for a specialist company. The second reason is that it goes a long way towards explaining why new injectors can cost several hundred pounds each, and the third is that it explains why all those filters are so important: the tiniest specks of dirt can be sufficient to abrade the surface of the needle valve enough to increase the leak-off to such an extent that the injector doesn’t open properly, or to wedge the valve open and allow fuel to drip out of the nozzle instead of forming a fine spray.
The same applies to injection pumps, because there is nothing an amateur mechanic can achieve by tinkering with them, other than a lot of damage. Even the apparently simple job of removing an injection pump is more complicated than it may seem, because re-fitting it involves adjusting it to make sure that the squirts of fuel are delivered to the right cylinders at the right time: it needs confidence and the right workshop manual.
HIGH-TECH FUEL SYSTEMS
The last few years of the twentieth century saw growing concerns, worldwide, about the use of fossil fuels and atmospheric pollution. Customers wanted cleaner, quieter cars and lorries, and legislators wanted to be seen to be doing something.
So, in December 1987, the European Union introduced Directive 88/77/EEC. Mirroring similar legislation imposed by other countries, including the USA, it was the first of a series of directives and regulations that imposed increasingly stringent limits on the exhaust emissions from road vehicles.
The effects are dramatic: it would take a convoy of 60 trucks built to the current (2018) ‘Euro V1’ regulations to produce the same amount of particulates (‘soot’) as a single one of the same power 25 years ago.
The rules also demand massive reductions in the amount of carbon monoxide (down by 87 per cent from 1988), hydrocarbons (down by 95 per cent) and oxides of nitrogen (down by 97 per cent).
None of this could be achieved by minor refinements: something far more significant was required. That ‘something’ was a major re-think of fuel systems to produce a finer spray from the injector nozzle by using higher pressures, and to give better control over the timing and the amount of fuel injected by using electronic control systems.
Europe-wide emission regulations for recreational craft were not introduced until 2003, and are still less demanding than the rules applied to road vehicles. But so many marine diesels are based on engines designed for cars, trucks and buses that anyone with a new-ish diesel should be aware that their engine is likely to have an electronic control system and either unit injectors or a common rail injection system.
ELECTRONIC CONTROL
A key part of any conventional fuel pump is the governor. At its simplest, this consists of a set of weights connected to the shaft of the pump. As the engine speed increases, the pump shaft turns faster, so the weights try to fly outwards. As they do so, they operate a mechanical linkage that reduces the amount of fuel being sent to the injectors. This, of course, slows the engine down, allowing the governor weights to move inwards again.
The engine control, in the cockpit or wheelhouse, is connected to the governor by a spring. By adjusting the engine controls the helmsman adjusts the spring tension so as to increase or decrease the speed at which the shaft has to turn before the weights move outwards far enough to slow the engine down.
The aim of all this is partly to stop the engine over-revving, but it also means that when you – the user – set the throttle for a particular engine speed, the governor will keep the engine running at that speed even if the loading varies.
Simple mechanical governors like this have been used to control machinery for centuries: you can see rudimentary versions in watermills, windmills, and on steam engines. But their place is now being taken by electronic control units (ECUs) – sometimes called electronic control modules (ECMs).
As well as monitoring the throttle position and shaft speed, an ECU is connected to a variety of sensors around the engine, monitoring factors such as the air temperature and pressure, the fuel temperature and pressure, and the coolant temperature. Taking all these factors into account, it can then tweak the timing and duration of each squirt, and even break a single squirt into several separate squirts to give the most efficient combustion.
The downside of electronic control systems is that they have done away with the rugged simplicity that used to be one of the great advantages of a marine diesel: a modern diesel is just as dependent on electricity as a petrol engine – just as vulnerable to the effects of salt, water and corrosion – and can potentially be brought to a standstill by the failure of a single sensor. Overall, modern diesels are still more reliable than their older counterparts – but only if they are kept clean and meticulously serviced.
UNIT INJECTORS
Unit injectors, in principle, are almost a retrograde step: they take us back to the days when each injector had its own high pressure pump. In a unit injector, however, there is no separate high pressure injection pump, as such. Instead, each injector includes its jerk pump element built into the top of the injector.
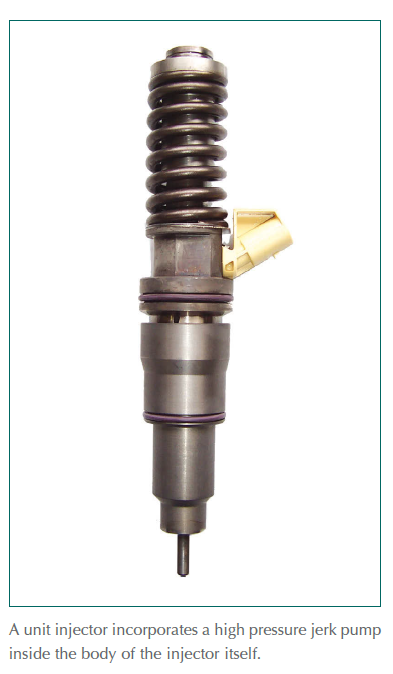
Fuel fl ows from the tank, through a pre-fi lter and then – driven by a low pressure lift pump – through a fi ne fi lter, just as in a conventional fuel system (Fig 5). From there, still at low pressure, the fuel fl ows directly to the injectors.
The jerk pump mounted on top of each injector pressurises the fuel to about 2500 bar (>35,000 psi) and dispenses the correct quantity of fuel to the injector nozzle.
In some cases, the pump is mechanically driven. Each cylinder has three rockers instead of the usual two. Two of the three rockers open the valves, exactly as they do in a conventional engine, while the third one operates the pumping element of the injector.
This alone brings potential benefi ts, because it does away with the need for injector pipes, and allows the injector to operate at far higher pressures.
But the real advantage comes when the unit injector is hydraulically operated and electronically controlled.
In the current generation of unit injectors, a hydraulic pump provides a source of high pressure engine oil to open the needle valve in the injector. The timing of each squirt and the amount of fuel injected is controlled by an electrical solenoid in response to signals from the engine’s electronic control unit.
COMMON RAIL INJECTION
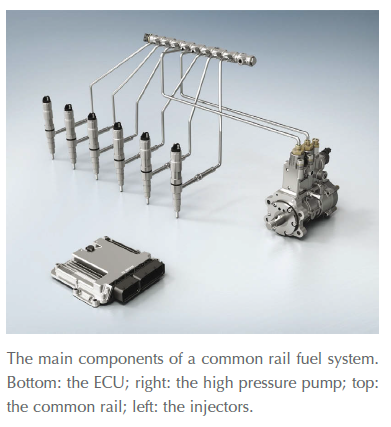
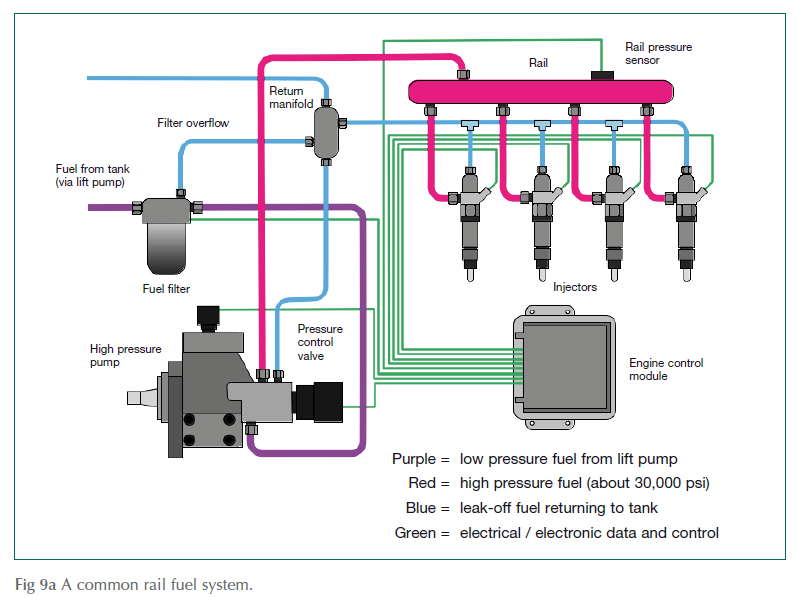
Like unit injector systems, the key feature of common rail or reservoir fuel systems is that the metering and control functions have been taken away from the injector pump altogether.
A low pressure lift pump pulls fuel from the tank through a pre-fi lter, and pushes it through a fi ne fi lter and on to the high pressure pump, just as in the conventional fuel system shown in Fig 5. But in a common rail system, the pump’s sole job is to provide a more-or-less constant supply of fuel at enormously high pressure – up to 3000 bar (43,000 psi) – to a tubular reservoir called the ‘rail’ mounted alongside the cylinders. From there, the pressurised fuel fl ows to the injectors.
The needle valve inside each injector is opened and closed by a solenoid in the head of the injector, triggered by electrical pulses from the ECU.
Because the high pressure pump is pumping continuously, rather than in measured squirts, it can maintain an almost constant pressure in the rail and injector pipes, so the pressure at the injector doesn’t fl uctuate as it does in a conventional system. This produces a more consistent spray pattern.
The high pressure also means that the droplets of fuel in the spray are smaller, so they burn more effi ciently.
And because the injector valve opening is controlled electrically, rather than by surges of pressure, the timing can be varied, and it can even be made to open and close several times in a single cycle.
... THINGS TO DO
There is absolutely nothing an amateur mechanic can or should do to the internal working parts of an electronic control unit, to a unit injector, or to a common rail fuel system, without specialist expertise and equipment. Meddling with any of them is likely to do more harm than good, and may be dangerous.
Never try to ‘bleed’ a common rail system by ‘cracking’ (loosening) any of the joints in the high pressure pipes between the high pressure pump and the rail or between the rail and the injectors.
- Regular checking and changing of fuel fi lters and water traps is more important than ever.
- Visually inspect electrical connections, and clean/tighten if necessary.
- On rocker-driven unit injectors, check and adjust the rocker clearances in accordance with the manufacturer’s instructions.
SAFETY FIRST
Diesel fuel can cause skin problems, especially in people who have become sensitised by repeated contact. Avoid the risk by using protective gloves and by keeping your hands clean.
The fuel leaving the injection pump is at such high pressure that it can penetrate skin. This is particularly true of the very fi ne droplets that leave an injector at high speed. Never expose yourself to high pressure diesel.
1. DRAINING THE PRE-FILTER
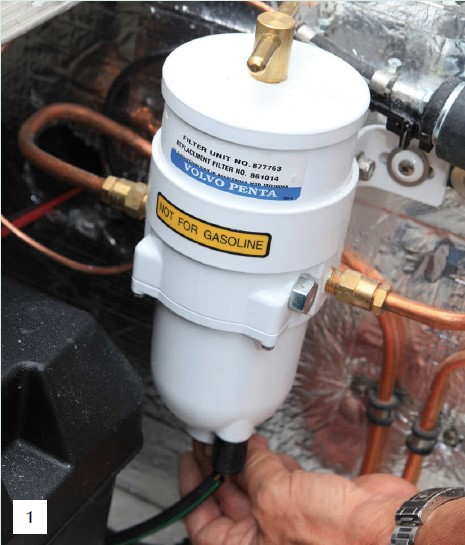
The pre-filter is the part most likely to be affected by water or dirt from the fuel tank, so it should be checked frequently. The optimum interval will vary widely, depending on how clean your fuel is to start with, and how quickly you’re using it, as well as on the filter itself, but after every ten hours’ running is usually about right.
Many pre-filters have a transparent bowl at the bottom, so you can see any dirt or water at a glance. If yours doesn’t have this, or if you can see a layer of dirt or water collecting at the bottom, you will need to drain it.
- a. Slacken the drain screw at the bottom and allow the contents of the filter to run off into a suitable container such as a jam jar until clean fuel emerges.
- b. Shut the drain screw, being careful to avoid using excessive force (it’s hollow, and can snap easily), and then dispose of the contaminated fuel carefully.
- c. Some pre-filters have a replaceable element similar to that in a cartridge-type fine filter, and which should be replaced in much the same way.
2. REPLACING THE FINE FILTER
The fuel filter should be changed at least once a season, or after about 200 hours’ use. Start by cleaning the area around the filter, and placing a bowl or rags underneath to catch any spills. If your filter is below the level of the fuel in the tank, shut the fuel cock on the tank, but remember to open it again before attempting to start the engine. In any case, you will have to bleed the system before starting the engine.
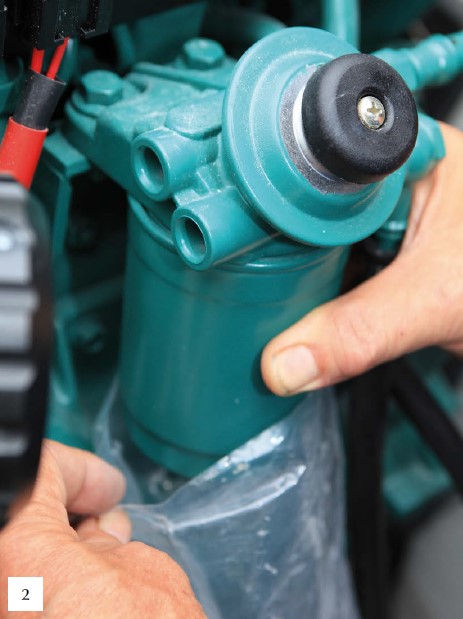
SPIN-ON FILTERS
- a. Use a strap or chain wrench to unscrew the filter canister. If this isn’t available or doesn’t work, try a large pair of gas pliers or a set of stillsons (pipe wrench).
- b. Smear the sealing ring with a thin film of fresh oil, then spin the filter on until the sealing ring just touches the filter head.
- c. Tighten the filter another half turn by hand. Do not over-tighten it by using any kind of tool.
CARTRIDGE FILTERS
- a. Unscrew the central bolt to release the filter body.
- b. Remove the cartridge, and replace it, making sure that the various springs and washers are replaced in the correct order, and that the filter is the right way up. Make sure the old rubber sealing ring isn’t stuck to the filter head, and replace it with the new one supplied with the filter.
- c. Replace the complete assembly, making sure the filter body is correctly seated, and tighten the retaining bolt.
WATER TRAP FILTERS
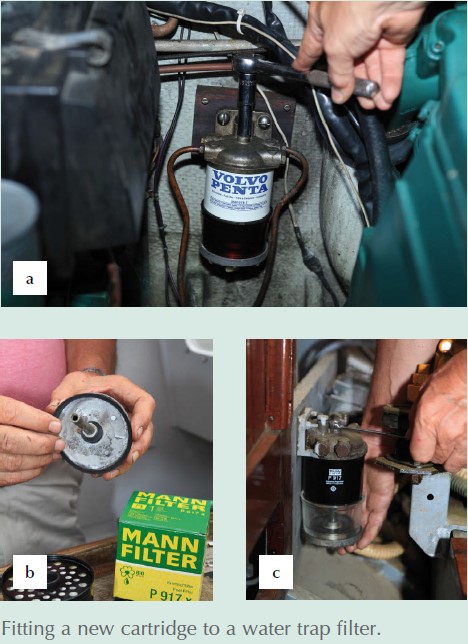
Some filters have a bowl designed to trap water underneath the filter cartridge.
The sequence of photos below shows the fitting of a new cartridge:
- a. Slacken the drain tap in the bowl and drain off the contents of the filter. Then unscrew the bolt that protrudes from the centre of the bowl.
- b. Reassemble the filter with a new cartridge and the new seals that are supplied with it – noticing that the upper and lower seals are different.
- c. Tighten the central bolt gently and carefully, applying no more than about 10 lb to the end of a typical spanner.
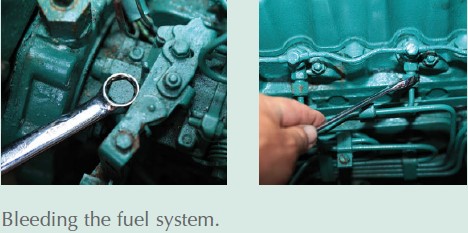
3. BLEEDING THE FUEL SYSTEM
Even a very small amount of air in the fuel system can be enough to stop a conventional diesel, because if air bubbles reach the injector pipes they can act as shock absorbers that prevent the pressure from rising sufficiently to open the injector’s needle valve.
If the engine suddenly stops or misfires, or if you have let air into the system by running low on fuel or changing a filter, you may have to remove the air by ‘bleeding’ the system.
Special hollow bolts called bleed screws are provided for the purpose.
In principle, the process involves working from the tank towards the engine, slackening each bleed screw in turn until clear diesel comes out, then tightening that screw and moving on to the next one.
Look for bleed screws at the highest point on top of each filter and on the injector pump. If you can’t find a bleed screw, it is usually enough to slacken one of the pipe unions instead, but bear in mind that many newer engines are ‘selfbleeding’: they will bleed themselves if you crank the engine over for long enough.
Never try to ‘bleed’ a common rail system by ‘cracking’ (loosening) any of the joints in the high pressure pipes between the high pressure pump and the rail or between the rail and the injectors.
References
Adlard Coles Book of Diesel Engines

